Showing posts with label grains you can eat whole (other than rice). Show all posts

Friday, February 22, 2013

Kitchen Experiments: Popping Sorghum (and Amaranth) Part II

Now that I have a bit more time to do stuff, what with recent blogging projects done (again: PHEW), I thought I would give the sorghum popping experiment from a few years ago one last revisit.  As you (and the various commenters who have visited) may remember, this experiment did not go too well for me: popping it in a still or shaken pot yielded few kernels, and using the hot air popper just caused a big mess of, again, mostly unpopped, slightly toasted sorghum kernels.  I say "slightly" because most were blown out of the hot air popper before I knew what hit me.  (Scratch that: the sorghum hit me.  Literally.)

Based on research I've done lately, including from links provided by several of the commenters in the first post, I've come to a few conclusions about what went wrong:

  • Some folks had suggested adding moisture to the seeds.  Perhaps the seeds I used were kind of low quality and a bit desiccated already.
  • Maybe use a dome popper.  One gentleman from Texas said he and his have been popping it for a few decades, and he uses this method.
  • Another commenter from Georgia notes that of all the things she tried, putting the sorghum in a deep pot with the lid on got her the best results, specifically if you turn down the heat in the last munite way low.
  • Growing your own sorghum might work out well for you.  Check out the many mail-order non-GM seed companies (one list is here, or else just do a Google search).
Thanks to Andrew Zimmern, sorghum popping has become just enough of "a thing" that some companies have begun specifically selling it and posting helpful videos on Youtube.  Just Poppin was a site whose folks posted once or twice, and had some videos that were useful.  Two in particular stood out for me.  In the first one, they use two teaspoons of olive oil in a pot and (I never caught the exact measurement but it looked like) 1/4 cup of sorghum.


For the second one, they show how to dry-pop it.  And as I discovered too late for my other experiments, one key here is to use a vessel that is not dark on the insides.  Yep, as great as cast iron is, this is one time you need to put it away, unless it's one of those enameled ones that is beige or something on the inside.  Mine is not.


With those ideas in mind, I set out to give a proper finish to my sorghum popping experiment.  The goal: to get as much as possible, and to note which conditions led to that.

The sorghum I used in this experiment was a brand new bag of Shiloh Farms Sorghum Grain.  This stuff is not as easy to find as I remembered - even many of the natural food markets were out of stock of this stuff (though they do normally carry it), but I did find it eventually at the Natural Market in Timonium, where I figured their big shelf of whole grains had it nestled in there somewhere.  In fact, they had a few bags of it.


Oh, and this time I took photos.

I had started with a bag that was a few years old, with pretty lackluster results, prompting my search for fresher stuff.  Maybe one or two kernels popped out of an entire 1/4 cup.  There is my first thing I learned: use fresh ones.

I set up a few experiments on my stovetop.  I gathered the following things for this round of experiments:
  • bag fresh sorghum (here: Shiloh Farms brand)
  • olive oil
  • 1/4 measuring cup and teaspoon
  • long wooden spoon
  • cast iron crock pot and deep sided stainless steel pot (this latter one yielded the best results)
Though several people have had success with the dome poppers, I opted not to buy one.  My reason: knowing my luck, it will work for everyone but me, so I will just save the $30 to $40 and not buy a new one after all.  However, if you do decide to try a dome popper, make sure it is one that circulates the sorghum.  The ones that blow from the bottom, from what I have read elsewhere on the internet, don't yield the best results.  Also note: the blow hot air poppers typically blow from the bottom.

Experiment 4a: Popping 1/4 cup sorghum in a crock pot with oil while stirring


For this, I waited until the oil was starting to shimmer.  I had the heat up to middle intensity...


...and dumped in a quarter cup of sorghum.  It may not have been as "shimmering" as I needed, because it didn't start popping for at least 20 seconds.


I might have also used more oil than I needed.  I wonder if maybe I almost "deep-fried" the sorghum, in a sense?


At any rate, I wound up with very few popped kernels of sorghum.

Experiment 4b: Popping 1/4 cup sorghum in a crock pot with no oil while stirring


For the next quarter cup of sorghum, the only difference was a lack of oil.  The results are on the right: substantially more sorghum kernels popped than with the oil.  With that, I decided I would likely have the most luck by leaving out the oil and just dry-popping the sorghum.

Experiment 5a: Popping 1/4 cup sorghum in a stainless steel pot with no oil while stirring

One problem remained: a large number of kernels simply burned instead of popping.  It was then that I re-watched the second video, and noticed that the Just Poppin' folks specifically recommend using a stainless steel pot for popping sorghum without oil.  Apparently the blackness of the cast iron just holds too much heat.


After all these years, you might be surprised that I do not, in fact, own a stainless steel stock pot.  I do now.  Seventeen bucks at Target.


First, heat your pot for a minute or two on medium.  Dumping the sorghum into a cold pot will not help pop your sorghum.  Shake the pot to distribute the sorghum evenly, and turn down the flame to low.


The kernels started popping pretty quickly, and with constant stirring I got lots of sorghum hitting me in the hand.


The result is the bottom plate: over half of the kernels popped, though the ones that didn't really didn't, becoming even more scorched than with the other methods.

Experiment 5b: Popping 1/4 cup sorghum in a stainless steel pot with no oil, lidded with no stirring

I also tried popping sorghum with the lid and no stirring, just maybe occasionally shaking the pot.


With this method, it is again important to make sure everything is evenly distributed.


With the lid on, I got a few kernels and a lot of smoke.


Still, this method gave me results that were better than those in the cast-iron skillet, though I also got a lot of scorched kernels.

Experiment 6: Popping amaranth in a stainless stell pot with no oil, while stirring and not stirring

One final thing I tried was popping amaranth.  I understand that you can do this as well, and whatever the case it is easier to do.  As with the sorghum I found a video for it, courtesy of Oldways and the Whole Grains Council, neither of which I knew existed but both of whose existences do not surprise me.


Not so hard, is it?  It's even kind of adorable.


Apparently, amaranth is easier to find in the Baltimore area than sorghum.  It is particularly easy to find in bulk.  The Natural Market in Towson and MOM's in Timonium carry this in bulk.  I got this one at MOM's.


For the amaranth, make sure you even it all out at the bottom of the pot.  Note: I really am using waaaaaaay too much in this photo.  This is a quarter cup.  But it still started popping immediately.


I got a significant amount of popped amaranth.  It was kind of adorable, almost like "Barbie Popcorn".


I also tried covering the amaranth and not stirring it.  This time I only did an eighth of a cup.  Again this was too much.


And again, lot of tiny, tiny popped amaranth seeds.

Conclusions

So I have finally found that I have had the most success with popping sorghum if I do the following:
  • use small amounts of sorghum (and amaranth for that matter)
  • dry pop it instead of using oil
  • use a light-colored vessel, specifically a stainless steel pot
  • constantly stir it instead of leaving it to pop all on its own
  • heat the pot first, keep it on medium until the kernels get to popping, and then turn down the heat to low.
Now that I've finally found success with popping this stuff, my next goal is to find out what else I can pop.  I've seen videos for rice and wheat on the internet.  This deserves the old college try, doesn't it?

Wednesday, October 12, 2011

Snacking State-by-State: Minnesota II - Oh what you can do with wild rice!

Some of Minnesota's signature official foods are native foods - wild rice, morels.  Minnesota's Native American communities have been using these ingredients for millenia, and are creating recipes with them today.


Official Name: State of Minnesota
State Nicknames: The Gopher State; The Land of 10,000 Lakes; North Star State
Admission to the US: May 11, 1858 (#32)
Capital: St. Paul (2nd largest)
Other Important Cities: Minneapolis (largest); Duluth (4th largest); St. Cloud (8th largest)
Region:
 Midwest; Great Lakes; West North Central (US Census)
RAFT NationsWild RiceBison
Bordered by:
 Manitoba & Ontario (Canada) (north); Lake Superior (northeast); Wisconsin (east); Iowa (south); North & South Dakota (west)
Official State Foods and Edible Things: milk (drink); walleye (fish); honeycrisp apple (fruit); Northern wild rice (grain); blueberry muffin (muffin); morel (mushroom)
Some Famous & Typical Foods: Eastern and Northern European - especially Scandinavian (Norwegian, Swedish, Finnish, etc) - foods, especially lutefisk; Native American (Dakota, Ojibwe/Chippewa, etc) food traditions; dairy products

Minnesota has many bands of Native peoples, primarily Dakota and Chippewa/Ojibwe.  The last part is not a typo - the Chippewa are the Ojibwe, just with a differently pronounced name.  It is not difficult to find Native American recipes from the Upper Midwest.  Take the Bois Forte Band of Chippewa, who sell wild rice at the Nett Lake Wild Rice website, harvested "the traditional way":
...by two persons in a canoe. One person uses a long pole to push the canoe slowly through the rice beds. The other person, seated in front of the poler, uses a pair of smoothly-carved “knocking sticks” to pull the rice stalks toward the canoe and gently knock loose the ripened grains of rice. This technique ensures that only ripe grains fall into the canoe while unripe grains can continue to ripen for later harvest. [Bois Forte Band 2011]
I attempted two recipes from the Bois Forte Band's Nett Lake website, unfortunately not with their own brand of wild rice.  One recipe incorporates wild rice into one of the most common Native American foods in the US - frybread (that post goes up soon).  The other is a side dish incorporating another native Minnesota food, the mushroom.  In this case, I went all out and used something truly Minnesotan: the morel.

The recipe: Morel Mushroom Wild Rice (adapted from the Bois Forte Band of Chippewa)

For this pilaf you will need the following:


* wild rice (it's easy to find wild rice pilaf in the supermarket.  It's much more difficult to find bags of just wild rice.  I had to go to Trader Joe's for this.  A bag will run about $5.  Note: for this recipe you will need to prepare the wild rice first.  Follow the directions on the bag or at the Nett Lake recipe website)
* mushrooms (I got morels - see below for a little more about this)
* wheat germ (to give it a little bulk.  This set me back about $3 or $4)
* onion (bought one at the store, not expensive)
* parsley (from the garden)
* cumin and basil (had them)
* olive oil (had it too)


The recipe doesn't specify, but I wanted as complete a Minnesota experience as possible so I hunted down morels, the official state mushroom of Minnesota.  These are not cheap: Melissa's popular brand of dried goods is available at Wegman's.  A small box of morels will run - gasp - $9.  Since I saved money on the salmon from the previous recipe, I splurged on this.  But feel free to use any mushroom - fresh or dried and rehydrated


So I had these morels, right?  And I had to rehydrate them.


Chop or slice the mushrooms, and sauté them in a pan with the onions - sliced - and parsley - chopped - in the olive oil.


Next, add the wild rice and continue to sauté.


Add the remaining ingredients and cook for a few more minutes.


I thought this recipe needed a little salt, which you should do to taste.  Apart from that, this is a simple and filling dish to make.  You get a lot of mileage out of the nutty wild rice.  I have to admit: I didn't taste the morels too much.  Were I to do this again, I would use a cheaper mushroom.

Sources:

Adams, Marcia. Heartland: The Best of the Old and the New from Midwest Kitchens. Clarkson Potter: New York, 1991.

All Things Considered.  "Best Holiday Food: Tried Some of That Lutefisk?" Reported by Audie Cornish for National Public Radio. Original airdate: December 31, 2010.

Bois Forte Band of Chippewa.  "History".  From the Bois Forte Band of Chippewa website.  Copyright 2011.

Chiu, Michael.  "Gravlax".  From the Cooking for Engineers website.  Published September 2, 2005.

Dooley, Beth, and Lucia Watson.  Savoring Seasons of the Northern Heartland.  Alfred A. Knopf: New York, 1994.

Gates, Stefan.  "Homemade Gravlax".  From the Gastronaut website and the BBC Book Gastronaut, copyright 2006.

Henderson, Helene.  The Swedish Table.  University of Minnesota Press: Minneapolis, 2005.

Nett Lake Wild Rice.  "Recipes".  Copyright Bois Forte Band of Chippewa.

Seafood from Norway. "Norwegian Gravlax with Whole Grain Mustard Dill Sauce".  From the Seafood from Norway website.  Published 2005.  Copyright Eksportutvalget for fisk (Norwegian Seafood Export Council), 2005.

Some information also obtained from Wikipedia's "Minnesota" page and other pages, and the Food Timeline State Foods link to "Minnesota".

Monday, April 18, 2011

Quinoa is Kosher for Passover, right?

According to The Atlantic's Uri Friedman, not necessarily. If you want to be absolutely sure, check with the Chicago Rabinnical Council, who say you can use quinoa. As long as it's from Bolivia, where quinoa production is chametz-free. And even then it's a pain in the tuchus:

...[The Chicago Rabbinical Council] recommends inspecting quinoa before Passover by spreading "one layer of quinoa at a time on a board or plate" and checking to be sure that there are no other grains or foreign matter mixed in with the quinoa"--a time-consuming exercise that Jews rushing to prepare seders are unlikely to embrace. [Friedman 2011]
And here I was struggling to find creative ways to avoid meat on Fridays. Silly me.

Thursday, February 25, 2010

The Fonio Files

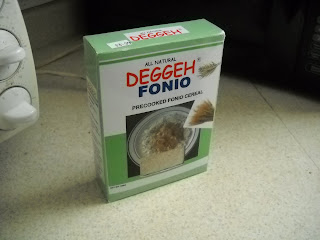
As of late, I've become obsessed with finding fonio. Fonio is a grain native to West Africa - in fact it is considered the oldest African domesticate. And people have liked the taste for thousands of years. But outside of West Africa, nobody has really heard of it.

My curiosity about this exceptionally nutritious crop started one Sunday during an episode of The Splendid Table. During one segment, host Lynne Rossetto Kasper interviewed Senegalese-American chef Pierre Thiam about the cuisine of Senegal, his Brooklyn, NY, restaurant Le Grand Dakar, and his new cookbook Yolele! Recipes From the Heart of Senegal. During the interview, they discuss the African miracle grain fonio, which Thiam tells Rossetto Kasper is almost impossible to ruin. It can be cooked somewhat like couscous. It can also be cooked in the microwave. But I was able to ruin my first batch, and after I did so (creating, in essence, a very lovely fonio hockey puck), I decided to find an actual recipe.

In honor of Vancouver 2010, the durable yet tasty fonio hockey puck.

Thiam includes a recipe for sesame fonio in his cookbook. Fortunately, it was sitting right there on the Splendid Table website. Even better, I had all the ingredients (or similar ones).

For sesame fonio (complete recipe is here), you need to stir fry 1/2 cup of black sesame seeds in a few teaspoons of peanut (or in my case, olive) oil.

Taken with the "Food" setting on my new camera. Looks a little like hot asphalt, doesn't it?

To 3 cups of salted boiling water, add the sesame seeds along with a cup of fonio. Reduce the heat - and I mean way down, otherwise you'll have sputtering fonio bubbling up in your face. I found it helpful to stir the whole thing. After a few minutes, it will absorb the water. Make sure you remove it from the heat and fluff it up.


The fonio has a pleasant, slightly nutty flavor, which the sesame complements well. I also found that the fonio absorbed some of the black sesame color, making it look like a big grayish blob with little black specks inside it. But the taste was quite pleasing, a little different from other grains I have eaten, in a good way. I also discovered through experimentation that fonio tastes quite good with soy sauce.

Sesame fonio, plated with stir fried baby lettuce and Nigerian-style deer stew

Now here's the difficult part: how does one find fonio in Baltimore? It's easy if you know where to look. You can only find it in African and African-Caribbean markets. Whole Foods doesn't carry it. Giant certainly doesn't carry it. Not even H-Mart carries it, and they have everything. Lucky for Baltimore, there are a few African markets in and around the city. I got mine from the Afro-Tropical Food Market across from the Senator, in Belvedere Square. I got 500 grams (1/2 a kilo, or about 1.1 lbs) of Deggeh brand fonio, imported from Mali via the Bronx, NY, for $4. The Splendid Table website also gives various mail order sources for fonio under the recipe for sesame fonio.

Wednesday, November 25, 2009

Food Ethnography on a Budget: Eastern Woodlands II: Wild Rice and Maple Syrup

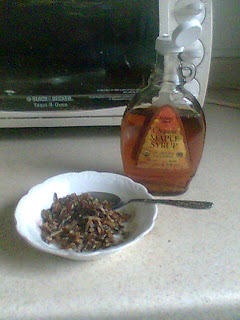
My next sample of Eastern Woodlands food - in this case, something clearly from the northern reaches of the Northeastern Woodlands - was a dessert. In her New Native American Cooking, Dale Carson does not have a recipe for "Wild Rice and Maple Syrup," per se. Why should she? It's ridiculously simple to do. All she advises is to take cold wild rice and slather it with maple syrup. She says it is one of the tastiest and most simple desserts one can eat.

But it sounds gross! Doesn't it?

Before attempting this very simple recipe, I had to remind myself that there are various examples of rice used in a dessert context in Asia (yes, I know wild rice is technically not rice but a different grain altogether). Anyone who has sampled the kheer rice porridge at your local Indian buffet knows that rice and sweetness work together. In fact, there are lots of grains that taste great when covered in something sweet and sticky. Oatmeal most readily comes to mind. Still, it sounded weird at first. It shouldn't have, but for someone with little experience consuming either wild rice or maple syrup, I just had to reorient myself to the concept.

I had both ingredients just lying around from the previous night's venison stew, so it cost me absolutely nothing extra.


It was just as easy as Carson made it sound: scoop wild rice in a bowl, cover it with maple syrup to your liking, done.

I am a convert. It was actually quite tasty! It went even better with whipped cream on top.

Thursday, March 19, 2009

Kitchen Experiments: Popping Sorghum

Note: I started this post a few months ago. I was inspired by Andrew Zimmern and the elusive idea of itty bitty popcorn. I just got swept up in stuff I had to get done, uploading the photos became a bother, and there you go. I've finally gotten around to posting it.

- - - - -

Ever since Andrew Zimmern stuffed his face with freshly-popped sorghum kernels in his Ethiopia installment of Bizarre Foods, I have been eager to try doing this myself. If you've never heard of this: apparently, whole sorghum can pop in much the same way that whole popcorn can. The problem: it's not that easy to find pop sorghum in the US, even in such a centrally located area as Baltimore.

In my internet research, I have found out a few interesting recipes and factoids:
  • Pop sorghum is very popular as a snack in many parts of East Africa and South Asia. In India, it's called jawar (also spelled jowar).
  • You can pop sorghum in a few different ways, both reminiscent to how you pop popcorn. You can either heat about 5 mL (a little less than 1/2 teaspoon) of oil, heated in a covered pot until it's smoking, and then add about 50 g (3 T + 1 tsp) of sorghum seeds until fully popped. Some recipes call for shaking the pot, others don't. The other way to do it is to dump about a cup of sorghum seeds into a hot air popper.
  • Apparently, not all types of whole sorghum work for popping. One scientific article - and my own experimentation - showed that some strains of sorghum don't really pop at all. Or perhaps it's the way mine was packaged.
Experiment: Popping Sorghum
Needed:
  • sorghum, whole
  • covered pot
  • covered pan
  • cooking oil (vegetable or canola)
  • hot air popper
Pre-Experiment: finding whole sorghum
Note that not all "whole sorghum" is "pop sorghum". Also note that most "sorghum" sold in this area is in powdered, flour form. The Natural Market in Timonium carries four score varieties of Shiloh Farms products, but their Sorghum Grain is not one of them. Whole Foods doesn't even know what I'm talking about. The only place I could find it was at - you guessed it - H-Mart. Surprisingly, they had one and only one provider, Choripdong. Theirs is vacuum packed. I don't know if that affects anything or not.

Experiment 1: Popping sorghum in a pan
Zimmern's experience with pop sorghum had him watching Ethiopian women popping it on a large, hot surface, with all the little popped kernels flying up and down as they burst open. My omelette pan, which I bought in a fit of Julia Childish omelette-making hysteria, looked like it would fit the bill. I tried putting a little oil in the pan and once it was hot, pour in about 1/4 cup of whole sorghum.

After shaking it vigorously, I got a bunch of toasted grains of sorghum. Nothing popped.

At all.

Experiment 2a: Popping sorghum in a pot (while still)

My next experiment involved trying to pop the sorghum in a pot much like popcorn used to be popped. This recipe from the ICRISAT (International Crops Research Institute for the Semi-Arid Tropics) website is similar to many that explain how to pop sorghum in this fashion:

Pop sorghum
Ingredients:
50g sorghum grain
5ml cooking oil

Method:
  1. Heat the cooking oil in a covered container (pot) until smoking hot.
  2. Add the sorghum grain and leave to pop at low heat until all grain is popped.
Initially, I would have shaken it. But since the recipe specifically calls for you to leave it alone, I did. After following these directions to a tee - twice - the results were just not pretty. And the whole apartment smelled of burnt sorghum for two days.

Experiment 2b: Popping sorghum in a pot (while shaking)

Since leaving it alone didn't work, I resorted to shaking it the next time, covered. I still used the same amounts of oil and sorghum - 50 g (a little under 1/4 cup) of whole sorghum added to 5 mL (not sure how that translates, but I found something with milliliters on it to measure it out) of smoking vegetable oil, then shaken vigorously.

The results were almost as bad. They would have been as bad had I not gotten about three or four kernels of sorghum popped. Success? Not when you consider that there are hundreds of sorghum kernels in one quarter cup.

Experiment 3: Popping sorghum in a hot air popper

My last trick was to try it with a hot air popper. I did remember reading about one blogger, Loztnausten, and her attempt to pop sorghum on her blog Everything Free Eating, which sees how you can eat while eliminating whole food groups (an intriguing concept for a blog). She recommended using more sorghum kernels than popcorn kernels - if the recipe called for 1/2 cup of popcorn, add 3.4 of sorghum, since it's so tiny that you'll need more just to keep it in place. I may have remembered the advice, but not the measurement, as I think I put in at most 1/2 a cup (thinking I had upped it from 1/4).

So, I dumped about a half cup of sorghum into the popper, most of which came flying violently back out at me, spraying all over my countertop. What's worse, almost none of it had popped. But this technique did yield the most popped kernels of all - about twenty or thirty, but again, out of literally hundreds. It also didn't help that I had to keep stopping it to re-add many of the kernels that flew out at me.

Was the experiment necessary?

Imagine my surprise when I stopped by the Punjab grocery by the Waverly Farmers' Market, looking for a different variety of pop sorghum - or jowar, only to find a big-ass bag of already popped jowar!


My jaw dropped, as it seemed that all of my work was for nothing, since this nice big bag of already-popped sorghum was sitting right in front of me. I asked one gentleman who works there where I could find the unpopped variety (Punjab doesn't sell it). He suggested H-Mart ("the place on Route 40"), where I got this seemingly unpoppable Korean variety, and then maybe some other Indian groceries, or even a Latin market. Plus, in the back of my mind I was thinking an Ethiopian or African grocer might have it, so I will have to stop in one of those places to see for myself. So this experiment is already half-way done. Next step: to try other varieties of sorghum, to see if it's just this variety that doesn't pop well, or if I just don't know what the hell I'm doing.

I have no clue when I will get around to that. For now, I'll just eat the already-popped stuff.

UPDATE: February 22, 2013: Want to see my second and more fruitful (er, grainful) attempt at popping sorghum (and amaranth, too)?  Here you go.

Wednesday, November 12, 2008

Pre-Game Off-the-Cuff Recipe: Millet alla Bastianich

I got the idea to get myself into the Top Chef mood by inflicting a little painful creativity on myself - close my eyes and choose something at random to prepare for dinner. Whatever you choose, it has to be a major part of your meal.

I almost gave up when I looked in my fridge and pantry. It's not that I have nothing to use. On the contrary:

I am very lucky to have this much in my fridge. So many do not.

I have so much I have already prepared that it seemed wasteful to make yet another thing. But I am trying to fritter down my supplies and save myself some money in the process, so I threw those black eyed peas in the freezer and grabbed two 28-ounce cans of tomatoes. They're not the San Marzano kind that Adam Roberts suggests. But these are two other cans I had as backups. With my last head of garlic (NB: buy garlic next week) I set about to make Lidia Bastianich's tomato sauce, now one of my favorite sauces to eat (again, thanks Adam).

8:00 - Both Lidia and Adam like theirs chunky, so they recommend mooshing them up in a big bowl with your hands. I like mine smooth, and I'm lazy anyway, so in the blender they go!

8:03 - Let's start disemboweling that head o' garlic!

8:06 - Phew! I didn't realize how long it'd take to crush all this garlic.

8:09 - Laziness takes over as I throw all those naked cloves of garlic into the spice grinder. Hey, it's clean, no problem...

8:10 - 1/2 cup of olive oil goes into the pan (NB: buy olive oil next week too).

8:15 - The tomato purée is now in there too. I'm washing that basil I have in the fridge and I notice it, well, is a little brown. Still edible after washing, but let's get rid of those stems. Into the pan they go!

Mmmm. Marinara.

8:18 - Okay, here's where I get all Top Chef-y. I am going to close my eyes and choose something from the pantry to eat with the tomato sauce. I grab something off of each shelf, just in case I grab something I can't eat, like parchment paper.

A minute later I have in my hand...


...a bag of millet and a canister of baking powder.

Well I can't eat baking powder, but the millet I can do something with!

Just one problem: how do I do something with it?

Indigenous to much of Africa and northern China, millet can (according to several websites I checked out about half an hour ago) be boiled much like rice. But depending on what you do with it beforehand, it will either be mushy like porridge or fluffy like couscous. It depends on how you like it. Dr. Andrew Weil - yes, that guy with a 10-foot long beard, a shiny bald head and a gigantic grin whose products you see in all the health food stores - suggests 1/2 cup millet to 1 1/2 cup water. That's the amount I used. But before I just dumped it in, I needed to prep it. Vegan Coach suggests toasting it for 3 to 4 minutes, stirring constantly, so that the nutty flavor will come out. But do this only if you want it fluffy, not mushy. Hey, some people like mushy millet (for that, just rinse it off without toasting it).

8:24 - Just dumped the millet in the hot cast iron skillet, no oil or anything.

8:28 - Just finished. It looks burned but it really does smell good, like toasted pine nuts. I'm pretty sure it's supposed to look like this.

Smell that toasted millet

8:30 - 1 1/2 cups of water boil away with a little salt, freshly ground black pepper and oregano, The toasted millet goes in, to simmer away for 25 minutes.

8:35 - Time to start writing this post!

8:40 - Just turning off the tomato sauce. No rush.

8:46 - Damn, I just realized that I forgot to add the tomato paste again! Oh well, I'll just add it now and start simmering the sauce again.

8:53 - The sauce is back off and now the millet is done. Did it turn out, or do I have a mess (like the last time I cooked quinoa, for example? Nobody should do that to quinoa. **SHUDDER**).

Is it good?


Yes! For a grain I have never cooked before, it turned out beautifully!


8:55 Et voilà! Toasted millet with my favorite tomato sauce from Lidia Bastianich. Sprinkle a little bit of feta on there (that's where the vegan part ends), and serve with something green (in this case, green beans) and a nice red wine. My choice: a 2006 Langmeil's Valley Floor Shiraz from the Barossa Valley of South Australia. Hey, a hearty grain needs a hearty wine!

9:34 - Edit post: I use too damn many exclamation points!!!