
The next several posts deal with different American regions or subcultures, and for my first one we hit the Pacific Rim. For this, as for the following eight posts, I wanted to capture some of the essence of the region with a classic recipe or else a recipe done in the spirit of this part of the country. For the Pacific States, I'm going with the latter, and getting all fusion-y.
Snacking State-by-State Redux III of X: The Pacific States
 What are the Pacific States?: Alaska, California, Hawaii, Oregon, Washington
Important Cities: Anchorage, Honolulu, Los Angeles, Portland, San Diego, San Francisco, San Jose, Seattle
Regions and Subregions: West, Pacific (Northwest; California; Polynesia); Pacific (US Census)
RAFT Nations: Acorn (coastal California and Baja California), Chile Pepper (southeastern California and the Baja California peninsula), Pinyon Nut (interior California and southeastern Oregon), Salmon (northern California, Oregon, Washington, Alaska and British Columbia), Taro (Hawaii),
Foods the Region is Best Known For: fusion foods; Asian American, Mexican and Native American, Alaskan & Hawaiian influences; seafood, especially salmon, halibut, cod, mahi mahi, Dungeness crab, snow crab, Alaskan king crab, scallops; pork and Spam (Hawaii); agribusiness, including grapes for wine; apples, blackberries; hazelnuts (Northwest) and macadamia nuts (Hawaii)

Important Cities: Anchorage, Honolulu, Los Angeles, Portland, San Diego, San Francisco, San Jose, Seattle
Regions and Subregions: West, Pacific (Northwest; California; Polynesia); Pacific (US Census)
RAFT Nations: Acorn (coastal California and Baja California), Chile Pepper (southeastern California and the Baja California peninsula), Pinyon Nut (interior California and southeastern Oregon), Salmon (northern California, Oregon, Washington, Alaska and British Columbia), Taro (Hawaii),
Foods the Region is Best Known For: fusion foods; Asian American, Mexican and Native American, Alaskan & Hawaiian influences; seafood, especially salmon, halibut, cod, mahi mahi, Dungeness crab, snow crab, Alaskan king crab, scallops; pork and Spam (Hawaii); agribusiness, including grapes for wine; apples, blackberries; hazelnuts (Northwest) and macadamia nuts (Hawaii)
- - - - -
Fusion cuisine is big along much of the West Coast, a place where people of many different cultural backgrounds mesh together. What I decided to make was a taco (Mexican), but I'm not stopping there: a salmon (Northwest Coast) tempura (Japanese) and kimchi (Korean) fish taco (California and Baja California), all topped with a chipotle (Mexican) and wasabi (Japanese) mayonnaise. This was my first time making tempura, not counting that one time I used a box mix which did not go so well. This time it was ridiculously easy. In fact, every component was easy, even the kimchi. It's just that this last part took the longest.
Though the idea for this taco is my own, the various recipes are not. The sources are listed as I go.
The Recipe: Kimchi and Salmon Tempura Fish Tacos with Chipotle-Wasabi Mayonnaise
First, we make the kimchi, and then the salmon tempura and mayo.
The Recipe: Cabbage Kimchi
I have always wanted to make kimchi. I love the stuff. But up until now I haven't really given myself a reason to do so. Since Korean food is becoming more and more popular in the US by the day, we are seeing more and more Korean cookbooks and recipes online, in the bookstores and in the libraries. I got a few out and settled on a simple recipe by Taekyung Chung, co-author with Debra Samuels of The Korean Table: From Barbecue to Bibimbap [2008]. Chung and Samuels have a simple kimchi paste and an even simpler kimchi - though this one is not a kimchi that will last more than a couple of weeks, as the authors note. The simple kimchi paste can be found on page XX of the cookbook, and how to use it on a simple head of green cabbage is on page XX. Or just go to The Splendid Table website [2008], where Chung and Samuels shared both the kimchi paste and cabbage kimchi recipes with Lynn Rosetto-Kasper

For the kimchi paste, assemble the following:
* Korean coarse red pepper flakes (I bought this for about $4 at H Mart, which has an unsurprisingly wide variety of Korean coarse red pepper flakes - many specifically labelled "for kimchi". Chung notes that this is one of the ingredients that cannot be swapped out if you can't find it. Just get on the internet and order some if you can't get it locally)
* fine-grain sea salt (oops, when I was at H Mart I got the coarse grained kind, for about $4, so I took a mortar and pestle to it - or just use kosher salt. That I should have done)
* garlic paste (I bought this at Trader Joe's for about $3)
* ginger (from the previous Hawaiian recipes)
* sugar (had it)
* oyster sauce (I needed a new bottle, which I picked up at H Mart for about $3)
* fish sauce (Korean chefs typically use a Korean anchovy sauce instead, but the authors recommend fish sauce since it's easier to find here)
* water (had that of course)
As for the kimchi, add that paste to:
* green cabbage (I did half a recipe so I used half a head of cabbage. Picked up the cabbage at Wegman's for about $1)
* more water
* more sea salt
* chives (I had just enough left over from a previous Washington recipe)
Also you will need a few gallon-sized ziplocked bags in which to let the kimchi ferment. Finally, it is very helpful to have a pair of latex gloves to wear while mixing the kimchi paste into the cabbage. We will be doing this with our hands.

First, cut up your cabbage into smallish, bite-sized pieces, and place in a very large bowl (in this case, I used a massive stoneware casserole dish. It was the largest thing I had on hand).

Pour water over the cabbage.

Then the sea salt.

Now, work it all together with your fingers. Let it sit for a few hours.

In the meantime, make your kimchi paste. Start with the Korean coarse red pepper flakes.

Add to that your water...

...garlic paste and ginger...

...and the rest of your ingredients, stirring as you go.

Mix everything together.

Keep most of it in the fridge. It'll keep for a few months, according to Chung and Samuels.

When ready to make your cabbage into kimchi, drain the cabbage in a colander.

Return it to your bowl and mix the kimchi paste into it, this time wearing kitchen gloves. Unless, of course, you like having burning, throbbing, kimchi paste colored hands. Just sayin'.

Work that kimchi paste in there.

Next, scoop the kimchi into a large zip locking bag.

Squeeze as much of the air out as possible. Best to just slowly roll the contents towards the opening to do so.

Zip lock it up and store in the fridge, turning your kimchi flavored cabbage into actual kimchi...

...which will take at least 24 hours.

This delicious, crunchy kimchi - which really does taste like what I've gotten so often in many Korean restaurants - is the most complicated step in these tacos. And to further note: the more it aged the more complex of a flavor it had (up to that two week threshold when it just started looking slimy). The rest is relatively easy. To wit.
The Recipe: Salmon Tempura (for Kimchi and Salmon Tempura Fish Tacos)
I also found more than a few salmon tempura recipes online. The only problem: most of those involved wrapping the salmon in nori. I have leftover nori, but I didn't want to use this. I just wanted to take strips of salmon and fry it, tempura-style. For this, I turned to Emi Kazuko's gorgeous - and spiral-bound (why aren't more cookbooks made that way? It's so easy to keep them open) Easy Japanese Cookbook [2008]. Her basic tempura recipe on page 135 of her book is not salmon-specific, but that's okay - I found several sources that said you must cut the salmon into thin strips in order to tempura fry it with the most successful results. Kazuko's batter worked beautifully for me, in large part because I followed this simple instruction from her:
Assemble the following for your salmon tempura:

for the tempura:
* flour (had it)
* egg yolks (not the whites, just the yolks)
* ice water (yes I had this too)
* salmon (cut into thin strips - I bought this frozen cheap at Trader Joe's for about $9 per lb, and thawed it out overnight. I used half of it for this, the other half for some spur of the moment gravlax. Because I can.)
* oil for deep frying (not pictured - I used rice bran oil in this case, but use any oil with a high smoke point, like peanut oil or, again, the much harder to find rice bran oil - $11 for a 2 L jug of the stuff at H Mart)
for the tacos, you need the above tempura-fried salmon, plus
* your kimchi (freshly made)
* cilantro ($2 per bunch)
* corn tortillas (had those too)
And your chipotle-wasabi mayonnaise, comprised of:
* chipotle peppers (a little over $1 for the can)
* wasabi powder or paste (had powdered on hand)
* sesame oil (had it)
* soy sauce (had it too)
* mayonnaise (I used the Duke's low fat mayo that I had in the fridge)
* lemon juice (had a lemon I zested for an earlier recipe)
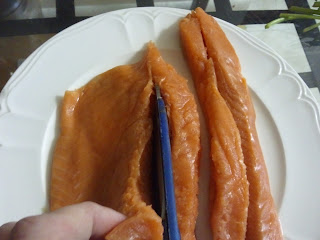
Cut your salmon into strips, preferably with the grain.

Plop those egg yolks into your ice water.

Add your flour and stir, making sure it is still lumpy when you're finished.

Dredge your salmon strips in a little more flour...

...and then dip them into your batter.

Gingerly slide them into hot oil for deep-frying (about 350° to 375°F).

Let fry for about two to three minutes.

Drain on paper towels, and try - just try - to avoid eating them all before they're even cool. This recipe was almost ruined because I struggled not to eat half of the tempura while it was still on the towel.
For the wasabi-chipotle mayonnaise, I found a few good recipes online. The one I ended up using was this one from Hawaii News Now [date unknown]. Their "chipotle-wasabi aioli" is an accompaniment to some ahi tuna flautas, which I did not make. The flautas, I mean.

Throw all the ingredients into a blender or food processor...

...and blend or process together.
Assembling these tacos is the easy part - even slightly easier than eating them, as I found out.

Take a warm corn tortilla (I love eating warm corn tortillas about as much as I loathe eating cold ones).

Put a generous dollop of kimchi in the center.

Then put a few pieces of tempura on top of that.

Add your mayo and cilantro.

This is a recipe that turned out so well in the end. The crunchy tempura coating around the soft salmon, cradled on top of that even crunchier kimchi, covered in chipotle and wasabi and a few leaves of cilantro on top, and this is just heavenly. I don't use that term often, because it's overused and kind of trite. But in this case, it is fitting. It's heavenly, dammit!
- - - - -
Next we head further east as we hit the Rockies, the Continental Divide and next time zone on the continent. Instead of separately tackling the Southwest (Tex Mex and/or New Mexican) and the Mountain West (Big Sky and the Rockies, some of which overlaps with the Southwest), I am looking at them together. Next week, I show my attempt at reconciling the different foods of the Mountain States.
Sources:
Chung, Taekyung, and Debra Samuels. The Korean Table: From Barbecue to Bibimbap. Tuttle Publishing: North Clarendon, Vermont, 2008.
Hawaii News Now (HawaiiNewsNow.com). "Ahi Flautas with Chipotle Wasabi Aioli". Date unknown. Copyright 2000-2012 WorldNow and KHNL, a Raycom Media Station. All rights reserved.
Kazuko, Emi. Easy Japanese Cookbook: The Step-by-Step Guide to Deliciously Easy Japanese Food at Home. Duncan Baird Publishers: London, England, UK, 2008.
Some information also obtained from the Food Timeline State Foods webpage.
Fusion cuisine is big along much of the West Coast, a place where people of many different cultural backgrounds mesh together. What I decided to make was a taco (Mexican), but I'm not stopping there: a salmon (Northwest Coast) tempura (Japanese) and kimchi (Korean) fish taco (California and Baja California), all topped with a chipotle (Mexican) and wasabi (Japanese) mayonnaise. This was my first time making tempura, not counting that one time I used a box mix which did not go so well. This time it was ridiculously easy. In fact, every component was easy, even the kimchi. It's just that this last part took the longest.
Though the idea for this taco is my own, the various recipes are not. The sources are listed as I go.
The Recipe: Kimchi and Salmon Tempura Fish Tacos with Chipotle-Wasabi Mayonnaise
First, we make the kimchi, and then the salmon tempura and mayo.
The Recipe: Cabbage Kimchi
I have always wanted to make kimchi. I love the stuff. But up until now I haven't really given myself a reason to do so. Since Korean food is becoming more and more popular in the US by the day, we are seeing more and more Korean cookbooks and recipes online, in the bookstores and in the libraries. I got a few out and settled on a simple recipe by Taekyung Chung, co-author with Debra Samuels of The Korean Table: From Barbecue to Bibimbap [2008]. Chung and Samuels have a simple kimchi paste and an even simpler kimchi - though this one is not a kimchi that will last more than a couple of weeks, as the authors note. The simple kimchi paste can be found on page XX of the cookbook, and how to use it on a simple head of green cabbage is on page XX. Or just go to The Splendid Table website [2008], where Chung and Samuels shared both the kimchi paste and cabbage kimchi recipes with Lynn Rosetto-Kasper

For the kimchi paste, assemble the following:
* Korean coarse red pepper flakes (I bought this for about $4 at H Mart, which has an unsurprisingly wide variety of Korean coarse red pepper flakes - many specifically labelled "for kimchi". Chung notes that this is one of the ingredients that cannot be swapped out if you can't find it. Just get on the internet and order some if you can't get it locally)
* fine-grain sea salt (oops, when I was at H Mart I got the coarse grained kind, for about $4, so I took a mortar and pestle to it - or just use kosher salt. That I should have done)
* garlic paste (I bought this at Trader Joe's for about $3)
* ginger (from the previous Hawaiian recipes)
* sugar (had it)
* oyster sauce (I needed a new bottle, which I picked up at H Mart for about $3)
* fish sauce (Korean chefs typically use a Korean anchovy sauce instead, but the authors recommend fish sauce since it's easier to find here)
* water (had that of course)
As for the kimchi, add that paste to:
* green cabbage (I did half a recipe so I used half a head of cabbage. Picked up the cabbage at Wegman's for about $1)
* more water
* more sea salt
* chives (I had just enough left over from a previous Washington recipe)
Also you will need a few gallon-sized ziplocked bags in which to let the kimchi ferment. Finally, it is very helpful to have a pair of latex gloves to wear while mixing the kimchi paste into the cabbage. We will be doing this with our hands.

First, cut up your cabbage into smallish, bite-sized pieces, and place in a very large bowl (in this case, I used a massive stoneware casserole dish. It was the largest thing I had on hand).

Pour water over the cabbage.

Then the sea salt.

Now, work it all together with your fingers. Let it sit for a few hours.

In the meantime, make your kimchi paste. Start with the Korean coarse red pepper flakes.

Add to that your water...

...garlic paste and ginger...

...and the rest of your ingredients, stirring as you go.

Mix everything together.

Keep most of it in the fridge. It'll keep for a few months, according to Chung and Samuels.

When ready to make your cabbage into kimchi, drain the cabbage in a colander.

Return it to your bowl and mix the kimchi paste into it, this time wearing kitchen gloves. Unless, of course, you like having burning, throbbing, kimchi paste colored hands. Just sayin'.

Work that kimchi paste in there.

Next, scoop the kimchi into a large zip locking bag.

Squeeze as much of the air out as possible. Best to just slowly roll the contents towards the opening to do so.

Zip lock it up and store in the fridge, turning your kimchi flavored cabbage into actual kimchi...

...which will take at least 24 hours.

This delicious, crunchy kimchi - which really does taste like what I've gotten so often in many Korean restaurants - is the most complicated step in these tacos. And to further note: the more it aged the more complex of a flavor it had (up to that two week threshold when it just started looking slimy). The rest is relatively easy. To wit.
The Recipe: Salmon Tempura (for Kimchi and Salmon Tempura Fish Tacos)
I also found more than a few salmon tempura recipes online. The only problem: most of those involved wrapping the salmon in nori. I have leftover nori, but I didn't want to use this. I just wanted to take strips of salmon and fry it, tempura-style. For this, I turned to Emi Kazuko's gorgeous - and spiral-bound (why aren't more cookbooks made that way? It's so easy to keep them open) Easy Japanese Cookbook [2008]. Her basic tempura recipe on page 135 of her book is not salmon-specific, but that's okay - I found several sources that said you must cut the salmon into thin strips in order to tempura fry it with the most successful results. Kazuko's batter worked beautifully for me, in large part because I followed this simple instruction from her:
The key to the success of tempura lies in a golden, crisp batter and timing. For a light batter, even the flour should be chilled (ideally overnight), and tempura should be eaten immediately after frying [Kazuko 2008: 135]I never would have thought to chill the flour before this. And make sure any water you use in making the batter is also freezing cold: dump a bunch of ice cubes into it and let that sit for a little while, until the cubes are melted but the water is still freezing. Or just put a bowl of water into the fridge for a while, or the freezer for a short amount of time.
Assemble the following for your salmon tempura:

for the tempura:
* flour (had it)
* egg yolks (not the whites, just the yolks)
* ice water (yes I had this too)
* salmon (cut into thin strips - I bought this frozen cheap at Trader Joe's for about $9 per lb, and thawed it out overnight. I used half of it for this, the other half for some spur of the moment gravlax. Because I can.)
* oil for deep frying (not pictured - I used rice bran oil in this case, but use any oil with a high smoke point, like peanut oil or, again, the much harder to find rice bran oil - $11 for a 2 L jug of the stuff at H Mart)
for the tacos, you need the above tempura-fried salmon, plus
* your kimchi (freshly made)
* cilantro ($2 per bunch)
* corn tortillas (had those too)
And your chipotle-wasabi mayonnaise, comprised of:
* chipotle peppers (a little over $1 for the can)
* wasabi powder or paste (had powdered on hand)
* sesame oil (had it)
* soy sauce (had it too)
* mayonnaise (I used the Duke's low fat mayo that I had in the fridge)
* lemon juice (had a lemon I zested for an earlier recipe)

Cut your salmon into strips, preferably with the grain.

Plop those egg yolks into your ice water.

Add your flour and stir, making sure it is still lumpy when you're finished.

Dredge your salmon strips in a little more flour...

...and then dip them into your batter.

Gingerly slide them into hot oil for deep-frying (about 350° to 375°F).

Let fry for about two to three minutes.

Drain on paper towels, and try - just try - to avoid eating them all before they're even cool. This recipe was almost ruined because I struggled not to eat half of the tempura while it was still on the towel.
For the wasabi-chipotle mayonnaise, I found a few good recipes online. The one I ended up using was this one from Hawaii News Now [date unknown]. Their "chipotle-wasabi aioli" is an accompaniment to some ahi tuna flautas, which I did not make. The flautas, I mean.

Throw all the ingredients into a blender or food processor...

...and blend or process together.
Assembling these tacos is the easy part - even slightly easier than eating them, as I found out.

Take a warm corn tortilla (I love eating warm corn tortillas about as much as I loathe eating cold ones).

Put a generous dollop of kimchi in the center.

Then put a few pieces of tempura on top of that.

Add your mayo and cilantro.

This is a recipe that turned out so well in the end. The crunchy tempura coating around the soft salmon, cradled on top of that even crunchier kimchi, covered in chipotle and wasabi and a few leaves of cilantro on top, and this is just heavenly. I don't use that term often, because it's overused and kind of trite. But in this case, it is fitting. It's heavenly, dammit!
- - - - -
Next we head further east as we hit the Rockies, the Continental Divide and next time zone on the continent. Instead of separately tackling the Southwest (Tex Mex and/or New Mexican) and the Mountain West (Big Sky and the Rockies, some of which overlaps with the Southwest), I am looking at them together. Next week, I show my attempt at reconciling the different foods of the Mountain States.
Sources:
Chung, Taekyung, and Debra Samuels. The Korean Table: From Barbecue to Bibimbap. Tuttle Publishing: North Clarendon, Vermont, 2008.
Hawaii News Now (HawaiiNewsNow.com). "Ahi Flautas with Chipotle Wasabi Aioli". Date unknown. Copyright 2000-2012 WorldNow and KHNL, a Raycom Media Station. All rights reserved.
Kazuko, Emi. Easy Japanese Cookbook: The Step-by-Step Guide to Deliciously Easy Japanese Food at Home. Duncan Baird Publishers: London, England, UK, 2008.
Some information also obtained from the Food Timeline State Foods webpage.


